

Introduction
You might have wondered, dear reader, about the wonderful logo of this site (or you might not have… but that’s ok, don’t worry). To make all of this hypothetical wandering disappear, I will dedicate this post to uncovering the identity of such a weird object.
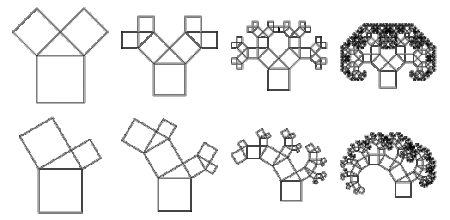
It is, as many other weird objects are, a fractal. Here are some pictures of fractals:

A fractal consists of a geometrical pattern that repeats itself indefinitely. Of course that is not a formal definition, and some people even use the word fractal while referring to objects that involve no repetitions whatsoever (look up the theory of fractal dimension, for instance). But apart from all the mathematical formalities, I, as many people, enjoy fractals just for the fun of generating them. This, apart from being an excuse to show off pretty pictures to your friends and family, can also be quite nice for getting more comfortable with recursion.
As a matter of fact, the half-assed definition I gave above is pretty similar to that of recursion in computer science (or math, where it is also extensively used), but with fractals, recursion can actually be seen in a tangible form. I always like this kind of things, where all of that theoretical rumbling coming out of your dreamy-eyed math professor finally turns into something that anybody can understand and appreciate: a colorful and psychedelic image.
So, the logo is a Pythagoras Tree. A Pythagoras Tree is just the typical picture that is used to represent the Pythagorean theorem…
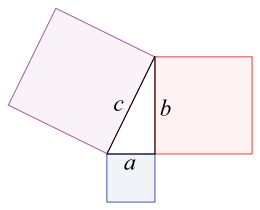
…repeated many times over.
You might have noticed that the resulting image is very different from the one posing as the logo, and in facts it pretty much is (good job to you sir!) Today, though, I’ll focus on generating Pythagoras trees of this particular kind, as I find them easier to understand.
Also, this post will aim to present an intuitive solution, which, as it is many times with intuitive solutions, is not the most performant, neither the most general or theoretically sound out of all the possible solutions. Pythagoras trees can in fact be considered as part of a broader topic: LSystems, which have a standard way of being generated. But LSystems will blatantly be ignored. At least for now…
Generating a Single Node
Let’s get started. We’ll first need a function to generate the tree itself. This function, as mentioned above, will have to be recursive, and so adhere to the following structure:
//the shell of the generate tree function in pseudocode
generateTree(seed) {
    node = generateNode(seed)
    leftChild = generateTree(node.leftSeed)
    rightChild = generateTree(node.rightSeed)
    return node + leftChild + rightChild
}
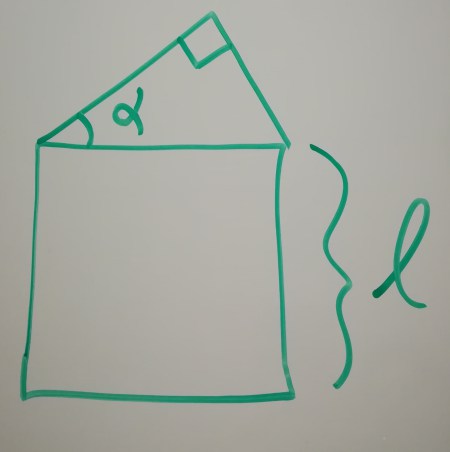
Where a node is a single “unit” of a tree. Here’s one:

Here are three nodes:
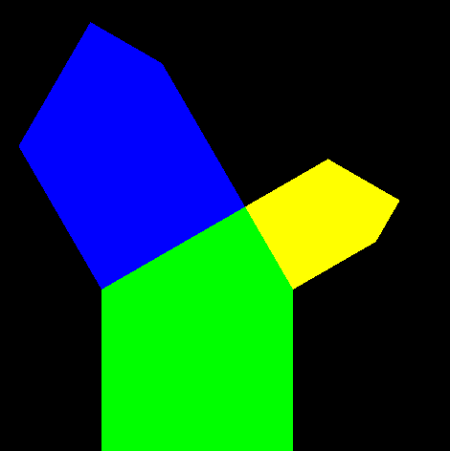
And here are 1023:
So a node is basically a right triangle standing on top of a square… Following our outline of intuitive reasoning, we’ll define one to be exactly that:
//a Pythagoras Node, which is really just a square with a right triangle sitting on top of it.
struct PNode {
    sf::Vector2f baseP1, baseP2, topP1, topP2, triangleP;
}
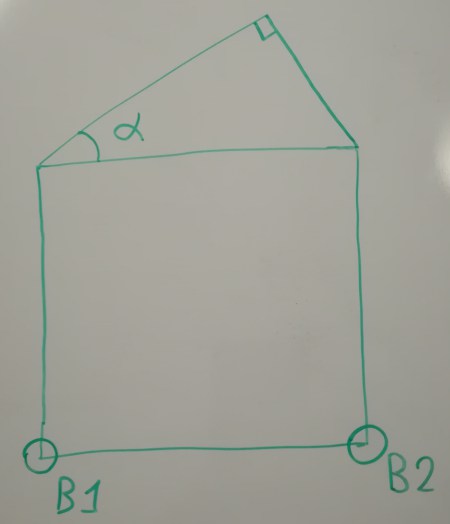
Next, we’ll need a function that spits out the points constituting a node. Of course, that function will need to know something about a node to actually generate one. How about giving it the length of the bottom square’s side and one angle from the triangle standing on top of it?
These parameters are fine for generating a node, but they do not suffice in the more general context of generating the whole tree. This is because the function will only be able to create a node independent of its position and rotation.
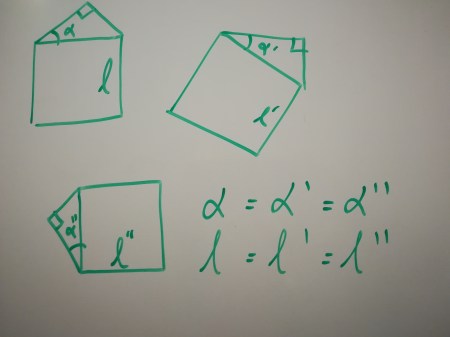
This could be fine. We could, for instance, generate the same node over and over again on each recursive step (or just generate it once and keep it), and then apply a pre-calculated transformation to its points to place it exactly in the right spot. But, to keep things simple and matrix-free, we’ll pick the more “recursion-friendly” way of coming up with parameters to generate the node starting from another node (hence the recursive nature). How about using the base of the square instead of just its side length?
This, of course, isn’t the only way to do it, but it’ll do. Now for the actual function:
//generates the points of a single node given the construction parameters
PNode PTree::generateNode(const sf::Vector2f& baseP1,
const sf::Vector2f& baseP2, float angle) {
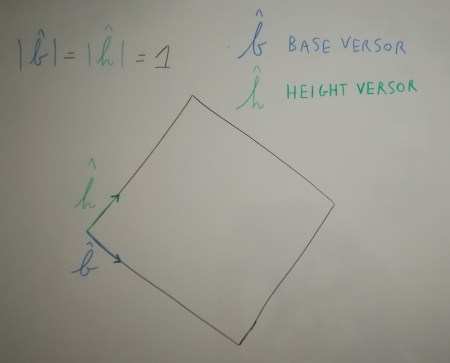
//get versors storing the directions of the base and height of the square
auto baseV = normalize(baseP2 - baseP1);
auto heightV = orthogonal(baseV);
//get side length and versor
auto sideLength = magnitude(baseP2 - baseP1);
//calculate top base points
auto topP1 = baseP1 + sideLength * heightV;
auto topP2 = baseP2 + sideLength * heightV;
//get versor poiting to tip of triangle (from the first top base point)
auto angleV = rotateVector(baseV, -angle);
//calculate tip of triangle by projecting the top base onto the triangle versor
// NB: this works because the triangle is right-angled
auto triangleP = topP1 + projection(sideLength * baseV, angleV);
//return obtained points as node
return PNode{baseP1, baseP2, topP1, topP2, triangleP};
}
Do not fret if you didn’t understand a word, as this could derive from a lot of understandable reasons - one the most prominent being perhaps the deliberate use of custom utility functions. Here’s all of their definitions to clear things up:
//some basic linear algebra utility functions
float magnitude(const sf::Vector2f& vec) {
    return float(std::sqrt(std::pow(vec.x, 2.f) + std::pow(vec.y, 2.f)));
}
sf::Vector2f normalize(const sf::Vector2f& vec) {
    return vec / magnitude(vec);
}
float dot(const sf::Vector2f& lhs, const sf::Vector2f& rhs) {
    return lhs.x * rhs.x + lhs.y * rhs.y;
}
sf::Vector2f projection(const sf::Vector2f& vec, const sf::Vector2f& base) {
    return dot(vec, base) / dot(base, base) * base;
}
sf::Vector2f rotateVector(const sf::Vector2f& vec, float angle) {
    sf::Transform rotation;
    rotation.rotate(angle);
    return rotation.transformPoint(vec);
}
If you’re still lost, be assured that everything will be slavishly explained. On the other hand, if you’re satisfied with just the code snippet above (and your excellent knowledge of linear algebra), you can skip the next section.
The Slavish Explanation
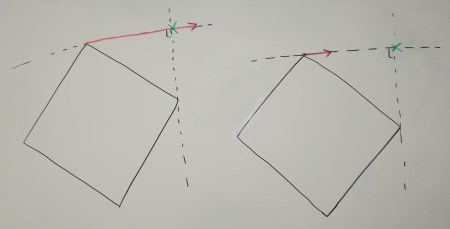
Let’s start with the bottom square generation. First, we get the base and height versors:
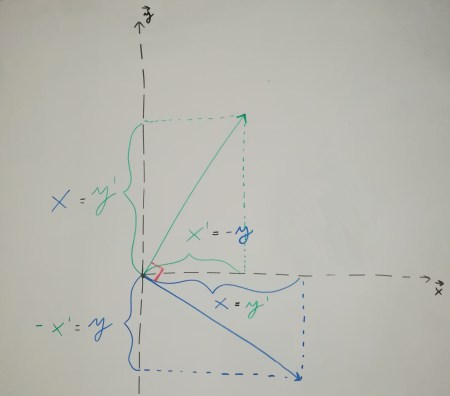
The orthogonal function just returns a vector orthogonal to the one passed; this in terms consists in inverting the coordinates and multiplying the y (which was previously the x) by negative one.
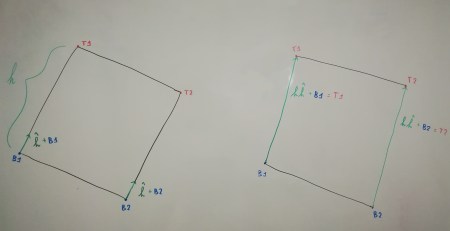
We then ride along the height versor by an amount indicated by the size of the square’s side. If we do this by starting from the baseP1 and baseP2 points we get, respectively, the topP1 and topP2 points (shown below).
We then need to generate the triangle standing on top.
One way to do this is to project the top base versor onto one of the two legs.
The projection of a vector v onto a vector w can be performed using the following formula:
But we still need to find the versor indicating the chosen leg’s direction (or any other vector pointing the same way). Well, we already have the top base versor (which is equal to the bottom base one), this means that we could just rotate that versor by the angle alpha, given to us through the function parameters, and obtain exactly what we need: the versor indicating the direction of one of the triangle’s legs.

Notice that vectors can be used independently of position. Here, I’m using them to indicate rotation (direction) and translation (length), while I’m using points to indicate absolute position. It always depends on your point of view, really, but this is indeed a very common way to use vectors and points in linear algebra.
The chosen angle could be either one. For this example, I picked the one to the left… because reasons. Note that this does require us to rotate the versor in a counterclockwise manner, which in SFML is done by passing a negative parameter to the rotation function.
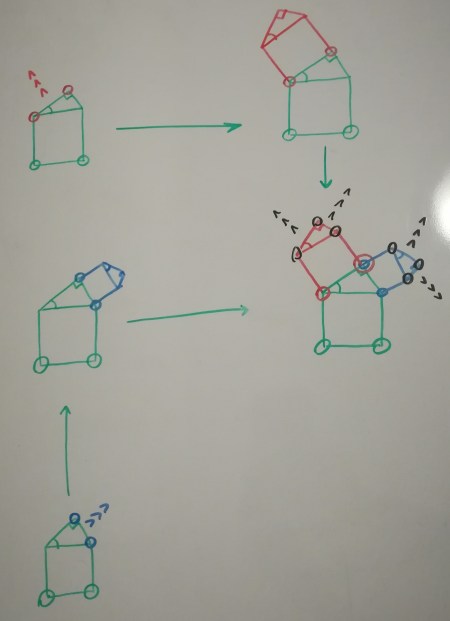
Generating the Tree
Now for the part we’ve all been waiting for. Behold, the tree generation function!
//generates a whole tree (returning its points in drawing order) given the parameters of the root node
//WARNING: this function is rong!
std::vector<sf::Vector2f>
PTree::generateTree(const sf::Vector2f& baseP1,
                    const sf::Vector2f& baseP2, float angle) {
    //result of function
    std::vector<sf::Vector2f> treePoints;

    //generate the node
    auto node = generateNode(baseP1, baseP2, angle);

    //recurse left
    auto leftTreePoints = generateTree(node.topP1, node.triangleP, angle);

    //recurse right
    auto rightTreePoints = generateTree(node.triangleP, node.topP2, angle);

    //join outputs
    auto nodePoints = node.points();
    treePoints.insert(treePoints.end(), nodePoints.begin(), nodePoints.end());
    treePoints.insert(treePoints.end(), leftTreePoints.begin() leftTreePoints.end());
    treePoints.insert(treePoints.end(), rightTreePoints.begin(), rightTreePoints.end());

    //return
    return treePoints;
}
The first thing that you might have beheld is the return type, which is no longer a structure. This is because a tree no longer has a fixed number of points, and so must be represented as a dynamic data type.

This is also the reason we need to convert the node structure into a vector with the points() method.
//Still the tree node structure. But this time, it can turn into a vector!
struct PNode {
    sf::Vector2f baseP1, baseP2, topP1, topP2, triangleP;

    std::vector<sf::Vector2f>
    points() const {
        return {baseP1, baseP2, topP1, topP2, triangleP};
    }
};
Another reason for representing the tree using a nameless data structure, instead of a structured type, is that we no longer need to give special names to points constituting the tree. Recall that this is in contrast with what we needed to keep track of a while ago, namely, which points of the node represented the right triangle. This to retain the ability to generate nodes starting from those exact points.
Addressing the Wrong Part
The other thing that might have occurred to you is the giant WARNING sign standing on top of the function.

The sign is there for a recurring reason in computer science: while the function is mathematically sound and correctly describes a Pythagoras tree, its results are incapable of being handled by a concrete computer program. As Albert Einstein once said,
So far as the theories of mathematics are about reality, they are not certain; so far as they are certain, they are not about reality.
And the same can be pretty much applied to Computer Science. For instance, you might have noticed that the function has no base case, which in recursion speak just means “an instruction that prevents the function from calling itself on some given conditions”. This is because, in our definition of a Pythagoras trees, we didn’t talk about no base case! We defined a tree to be infinite, and so a description of the tree in code would have to give rise to a structure just as infinite.
Of course, this is impossible. So to make our code generate a tangible entity, at a CS level at least (pixels on a screen), we’ll need to stain the tree function with some real-world logic. To be more precise, we need to add two modifications to our wonderful definition of a Pythagoras tree:
-
The delimiting factor (or base case), which will turn our definition into a function that generates finite Pythagoras trees of a given depth.
-
The graphics stuff, with the job of turning our tree structure (defined intuitively as the whole of its points) into something that SFML’s graphics system can understand and draw: a vertex array.
An Unnecessary Digression into Lazy Programming
Ah, might the crookedness of this word be cursed! Once again we must lower the beauty of pure maths to service the abominable concreteness of cold computer parts.

But there’s a catch… we can actually avoid doing this by using a particular technique dubbed lazy programming. This style of coding lets us do all sorts of wonderful things, such as define infinite data structures (rings any bells?) and then limit and/or modify them at will. All at 0 coupling and with zero added computations.

Alas, this post is not dedicated to applying such wizardries, which will be treated in (probably) another.
Also, keep in mind that C++ is really not the best language to use for this particular style of programming. Doing so is possible, of course (as anything is in any Turing complete language, especially C++, where code can be generated using the template system), but it may seem hard at first, and requires multiple preparatory explanations and workarounds. Other languages, like Lisp (kind of), Haskell, Clojure and even DLang, are much better suited, as they are actually built to interact nicely with lazy programming. If you’re interested, you could start by learning some of those.
Or you could wait and be amazed by my new post.
Back to Reality
Anyhow, we will now implement points 1 and 2 in order. Number 1 is really quite easy:
//generates a whole tree (returning its points in drawing order)
//given the parameters of the root node and the tree depth
std::vector<sf::Vector2f>
PTree::generateTree(const sf::Vector2f& baseP1,
                    const sf::Vector2f& baseP2,
float angle, Uint32 depth) {
    //base case - done generating the tree
    if(!depth)
        return {};

    //result of function
    std::vector<sf::Vector2f> treePoints;

    //generate the node
    auto node = generateNode(baseP1, baseP2, angle);

    //recurse left
    auto leftTreePoints = generateTree(node.topP1, node.triangleP, angle, depth - 1);

    //recurse right
    auto rightTreePoints = generateTree(node.triangleP, node.topP2, angle, depth - 1);

    //join outputs
    auto nodePoints = node.points();
    treePoints.insert(treePoints.end(), nodePoints.begin(), nodePoints.end());
    treePoints.insert(treePoints.end(), leftTreePoints.begin(), leftTreePoints.end());
    treePoints.insert(treePoints.end(), rightTreePoints.begin(), rightTreePoints.end());

    //return
    return treePoints;
}
The generation will now stop after a given amount of recursive calls.
The implementation of the second point requires an understanding of the sfml drawing system, and especially of how the library handles vertex arrays. If you never tried doing any of that stuff, there’s a nice tutorial at the official website: https://www.sfml-dev.org/tutorials/2.4/graphics-vertex-array.php.
In a nutshell, a list of vertices (of type sf::Vertex) needs to be passed to the sf::RenderTarget::draw() method along with a sf::PrimitiveType parameter, which determines how the vertices are drawn on screen.
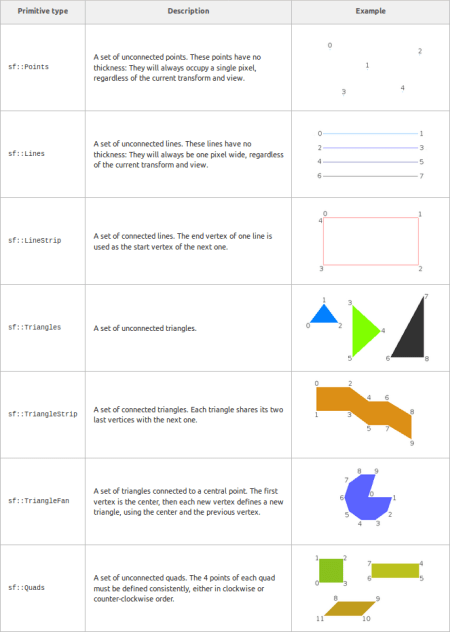
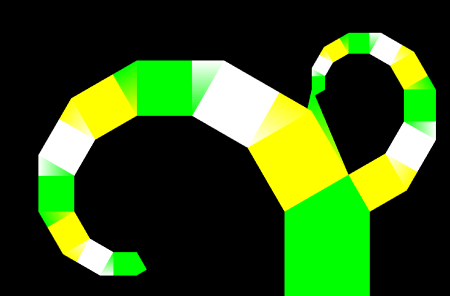
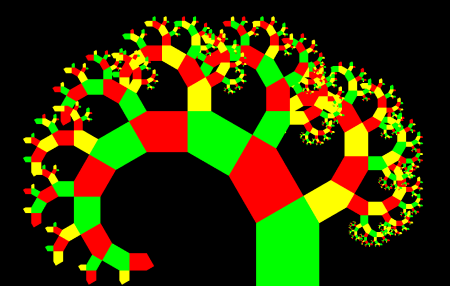
So we first need to actually pick a primitive type. At first, sf::TriangleStrip might seem tempting, but here’s what happens if we use it:

Nice, but wrong.
Another Error - Depth First vs Breadth First
What’s happening here is subtle, but very representative of the type of recursion that we’re using for generating our tree: the depth first method. In our case, that fancy name roughly translates to “go down until you hit the base case and then trace your way back up to take care of the other recursive branches.” This can be seen very well by removing the right node generation function.
 Achieved by removing the call to
 auto rightTreePoints = generateTree(...).
The tree is now drawn correctly, even if not in its entirety. So the sf::TrianglesStrip primitive works when drawing “half” of the tree. But what happens if we try to draw only a small portion of the right branches?
By now what happens should be obvious: the function first dives head first into the left branches, generating them until the depth parameter runs out, then, and only then, it starts to care about generating the right part of the tree. Our error manifests when the graphics system tries to connect the deepest point of the right branch to the first point of the left branch.
When the generation occurs unhindered, our bug is multiplied exponentially among recursive calls. Tis’ generally the nature of bugs in recursive code, which makes them at once hard to comprehend and beautiful when manifested. Isn’t this fascinating?
As I have already said many times, there is more than one way to fix this. The hardcore approach would be to generate the tree breadth-first.
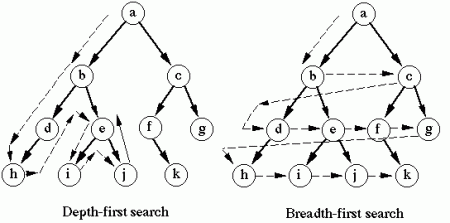
But since this would probably result in a streak of unending nightmares among the readers of this post (and also require a completely different approach), I shall spare you all from this folly.
Another way (much less presumptuous) is to switch to another primitive type altogether. The sf::Triangles primitive seems promising, as it will rid us from the responsibility of generating the tree points in a certain order, thus also decoupling the process of drawing a tree from the process of creating one (and remember, kids, decoupling is good for your health). This, though, would require us to generate more points than we really need to represent the tree with, since all triangles will require their own personal list of points to be drawn.
The keen minded among you might have noticed (and promptly insulted me for it) that our tree generation function is already generating too many points. To be more precise, the base of each node is duplicated on every recursive step. This detail has been neglected in consideration of what is currently being discussed: we actually need the duplicate points to keep the depth-first approach. In the already mentioned phantomatic future post, were the definition of the tree will be isolated from its graphical representation, this will be better handled.
After all this rambling, the solution might look easy: we just need to modify the PNode::points() function to return the points that we actually need.
// Tree node structure with updated points method.
// The method returns more points to fit the above explanation.
struct PNode {
    sf::Vector2f baseP1, baseP2, topP1, topP2, triangleP;

    std::vector<sf::Vector2f>
    points() const {
        return {baseP1, baseP2, topP2, topP2, topP1, baseP1, topP1, topP2, triangleP};
    }
};
Now here’s what happens when we generate the tree. At last, we can collect the fruits of our labour.

Ok all done, bye bye.
What? You want to see how to actually draw the tree? Ok then.
Drawing the Tree
In usual sfml fashion, let’s define a custom drawable/transformable class representing our tree:
//the one and only Pythagoras Tree class
class PTree: public sf::Drawable, public sf::Transformable {
    public:
        PTree(float sideLength, float angle, Uint32 depth);

    private:
        std::vector<sf::Vector2f> mVertices;
        void draw(sf::RenderTarget& target, sf::RenderStates states) const override;
};
And here’s the draw function:
//PTree constructor
PTree::PTree(float sideLength, float angle, Uint32 depth) {
    //generate tree points
    auto treePoints = generateTree({0, 0}, {sideLength, 0}, angle, depth);

    //convert points into a vertex array
    mVertices.reserve(treePoints.size());
    std::transform(treePoints.begin(), treePoints.end(),
        std::back_inserter(mVertices),
        [] (const auto& ele) {
            return sf::Vertex(ele);
        }
    );
}
Note that the conversion from points, of type sf::Vector, to vertices, of type sf::Vertex, (which, by the way, is also a more subtle manifestation of number 2 on the list of our real world stuff to implement) is separated from the actual generation of the tree.
This is probably inefficient, and directly returning the vertices from the tree generation function would have probably been nicer (if you’re interested in that double probably, look up loop fission optimization) and, at the cost of making this sentence way too long, I will once again mention that this is possible with lazy programming, but will not be covered here (ok I’m done now). I’ve decided to take this approach, thought, as a naive way to at least show some decoupling.
Now comes the fun part. As the hard bits are over, we can add colors or other visual effects to our tree.
//constructs the tree with random colorization
PTree::PTree(float sideLength, float angle, Uint32 depth) {
    //generate tree points
    auto treePoints = generateTree({0, 0}, {sideLength, 0}, angle, depth);

    //convert points into vertex array
    mVertices.reserve(treePoints.size());
    std::transform(treePoints.begin(), treePoints.end(),
        std::back_inserter(mVertices),
        [] (const auto& ele) {
            return sf::Vertex(ele,
                [] {
                    switch(rand() % 4) {
                        case 0:
                            return sf::Color::Red;
                        case 1:
                            return sf::Color::Green;
                        case 2:
                            return sf::Color::Yellow;
                        case 3:
                            return sf::Color::White;
                        default:
                            assert(false);
                    }
                }()
            );
        }
    );
}
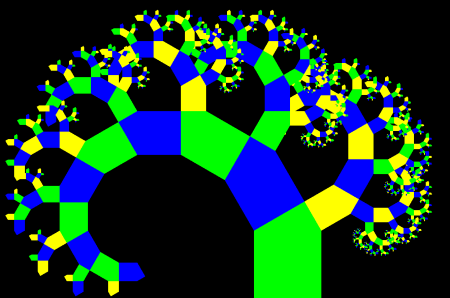
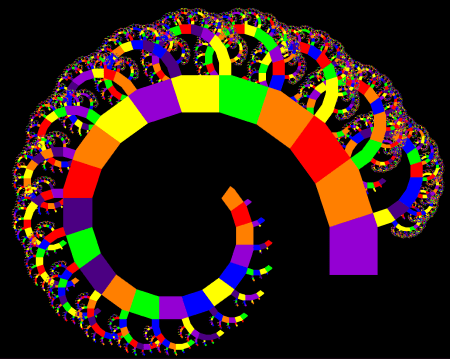
And here are some more trees generated with the same program by tweaking some stuff.


And here are some obtained by changing the node angle.


For this post I will limit myself to this, but the possibilities are really endless once you transition to the world of generative art. Maybe a future post will be dedicated to applying visual effects to our fractals by means of raw OpenGL shaders.
Alright this turned up to be a long post. And I can’t help but admit that a lot of it was vague and not really on point… Guess I’m still learning. In the future I will try to develop on that front.
And it will be shorter. Waaay shorter.
Well, that’s pretty much all I have to say. Have a nice day.